The Advanced Registration feature in hapily provides a powerful way to manage complex event ticketing and attendee data collection. This approach allows you to move beyond simple forms and create a tailored purchasing experience for your attendees.
Using this approach allows you to:
-
Sell tickets with specific costs, capacities, and availability windows.
-
Create conditional registration flows (different "doors" for different types of attendees).
-
Sync financial data directly to HubSpot via automated Deals and Line Items.
-
Manage guest information for individual ticket holders or bulk purchasers.
🎥 Video Walkthrough:
hapily | Paid Registration Setup Overview - Watch Video

Step 1: Initialize the Event in Event Builder
-
Open the Event Builder and begin creating your event as usual.
-
Set your Date, Time, and Timezone.
-
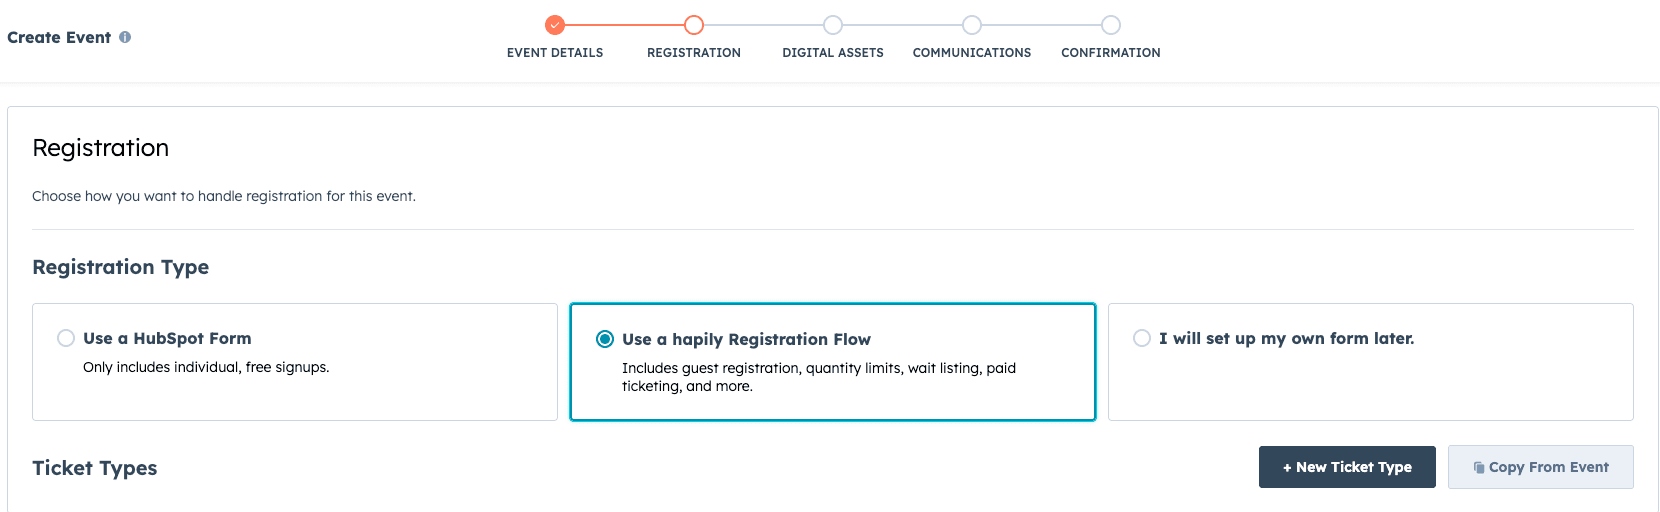
When prompted for how to collect registrations, select hapily registration flow. This option is required for selling tickets or using conditional logic.
Step 2: Create and Configure Ticket Types
-
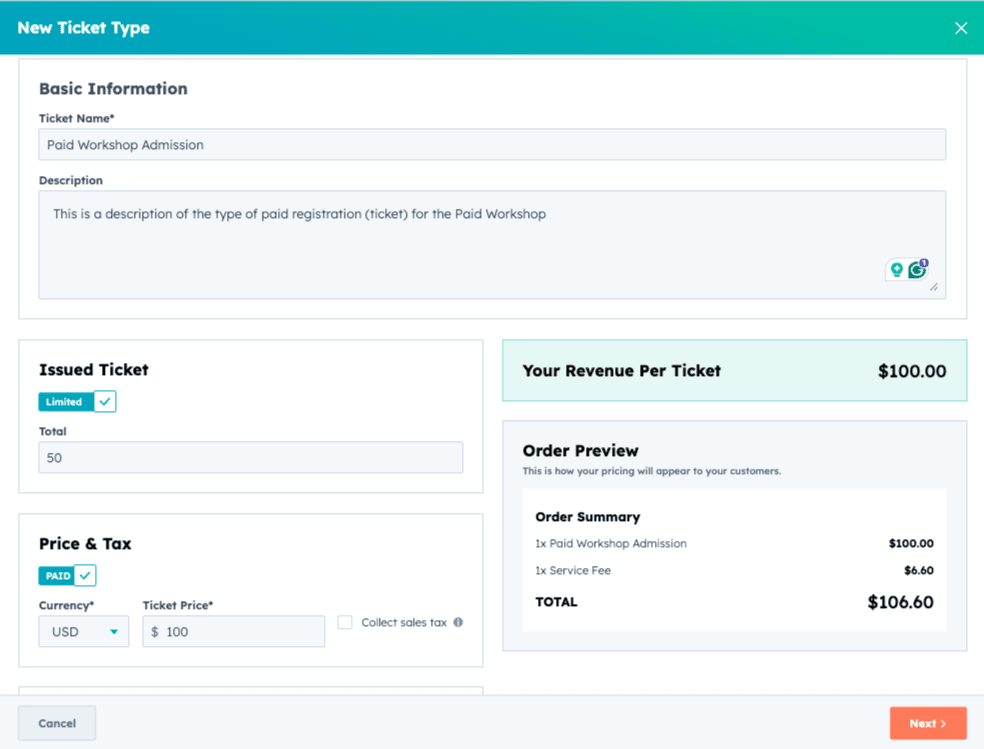
Click to create a New Ticket Type (e.g., "Paid Workshop Admission").
-
Set the Capacity Limit to define how many tickets are available for this specific type.
-
Toggle the Cost switch to "On" and enter the Registration Cost per ticket.
-
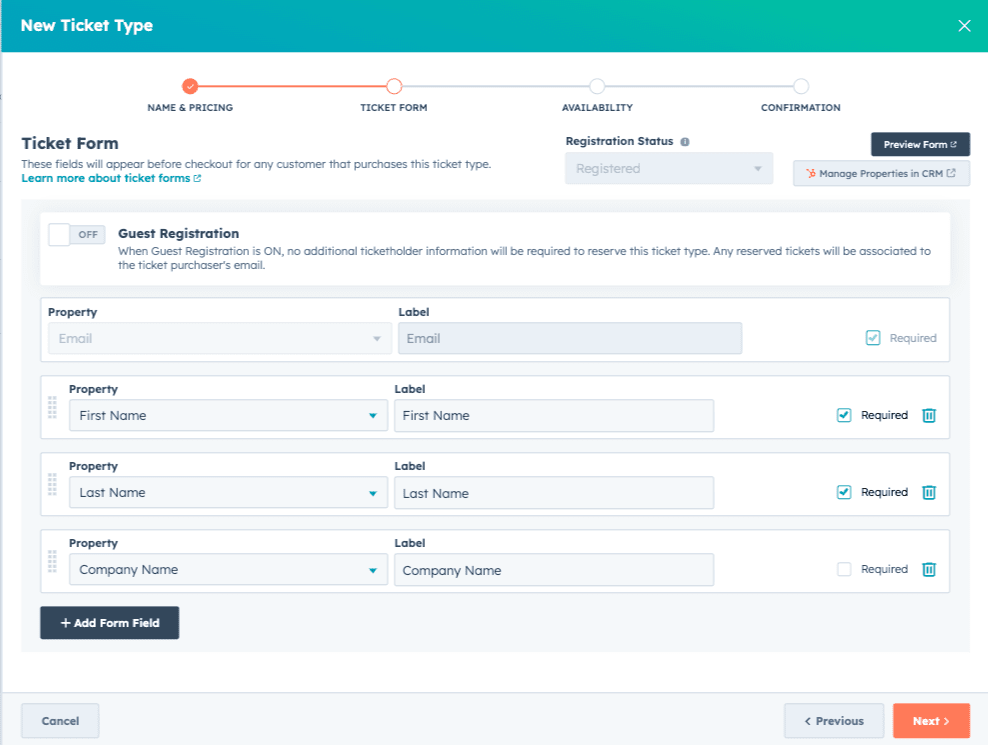
Define the Attendee Information you need to collect. Select properties like First Name, Last Name, Email, and Company. You can map these to HubSpot Contact properties or custom Registrant record properties.
-
Choose whether to enable Guest Registration.
-
Off: You only collect info for the purchaser.
-
On: You collect unique information for every individual ticket holder.
-
Step 3: Set Availability and Confirmation Details

-
Under Availability, choose to make the tickets available Immediately or schedule a specific start and end date/time.
-
You can also set the registration to end automatically once the Quantity is reached.
-
In the Purchase Information section, add a custom message that attendees will see after buying (e.g., "We can't wait to see you at the workshop!"). This information will appear in their confirmation and portal.
- Customize the Registration Confirmation information shown after the registration is submitted on the Confirmation tab for each ticket type.

Step 4: Design the Buyer Form and Branding
-
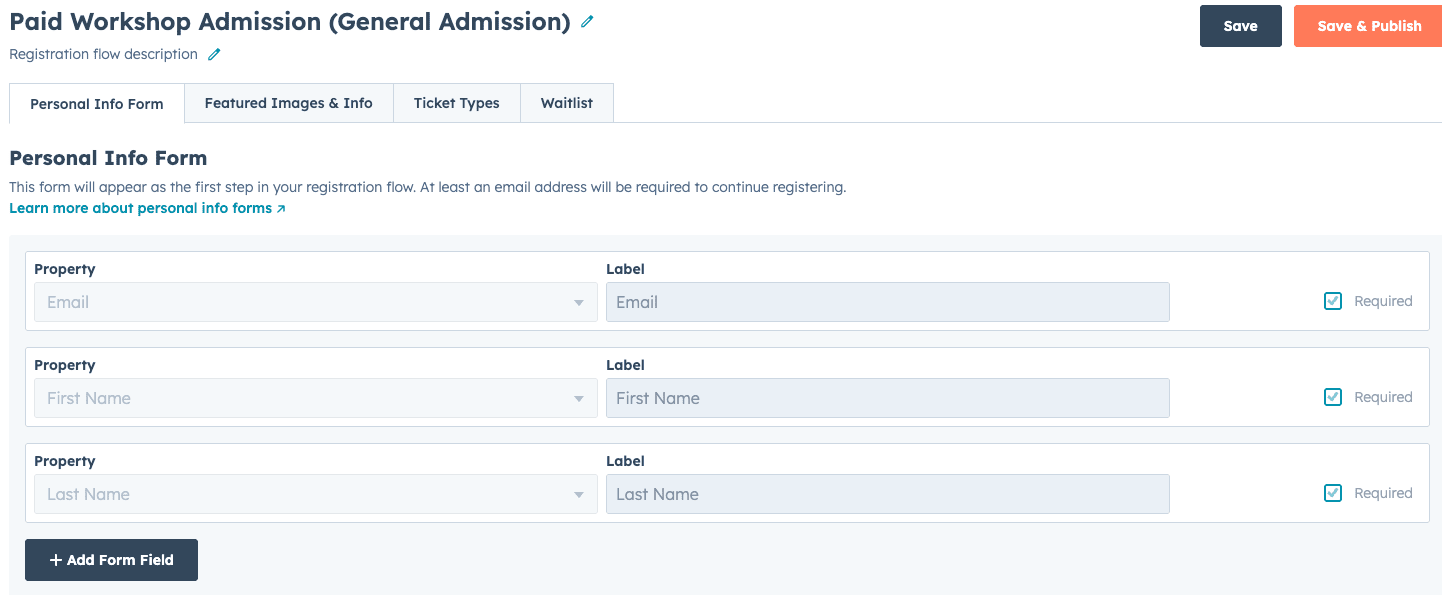
Configure the Personal Info Form. This is the information captured from the person actually performing the transaction, regardless of how many tickets they buy.
-
Upload a Featured Image to customize the look and feel of your registration flow or page.
-
Continue through the Event Builder to finalize the event record creation in HubSpot.
Step 5: Create Registration Flows - What registrations are available to whom
Think of a Registration Flow as a specific "door" to your event. This form will appear as the first step in your registration flow. At least an email address will be required to continue registering which will link all registrations for the event together.
If the tickets support guest registration, all registrants will be associated with the contact who registered for the event.
-
Navigate to the Registration Flow tab within your event.
-
Create a new flow (e.g., "General Admission" vs. "Sponsor Tickets").
-
Select which Ticket Types are visible in this specific flow.
-
(Optional) Enable a Waitlist if the event reaches capacity.
-
Save and Publish the flow to generate a unique URL. You can host this link on a HubSpot landing page or share it directly.
Step 6: Review the event in hapily
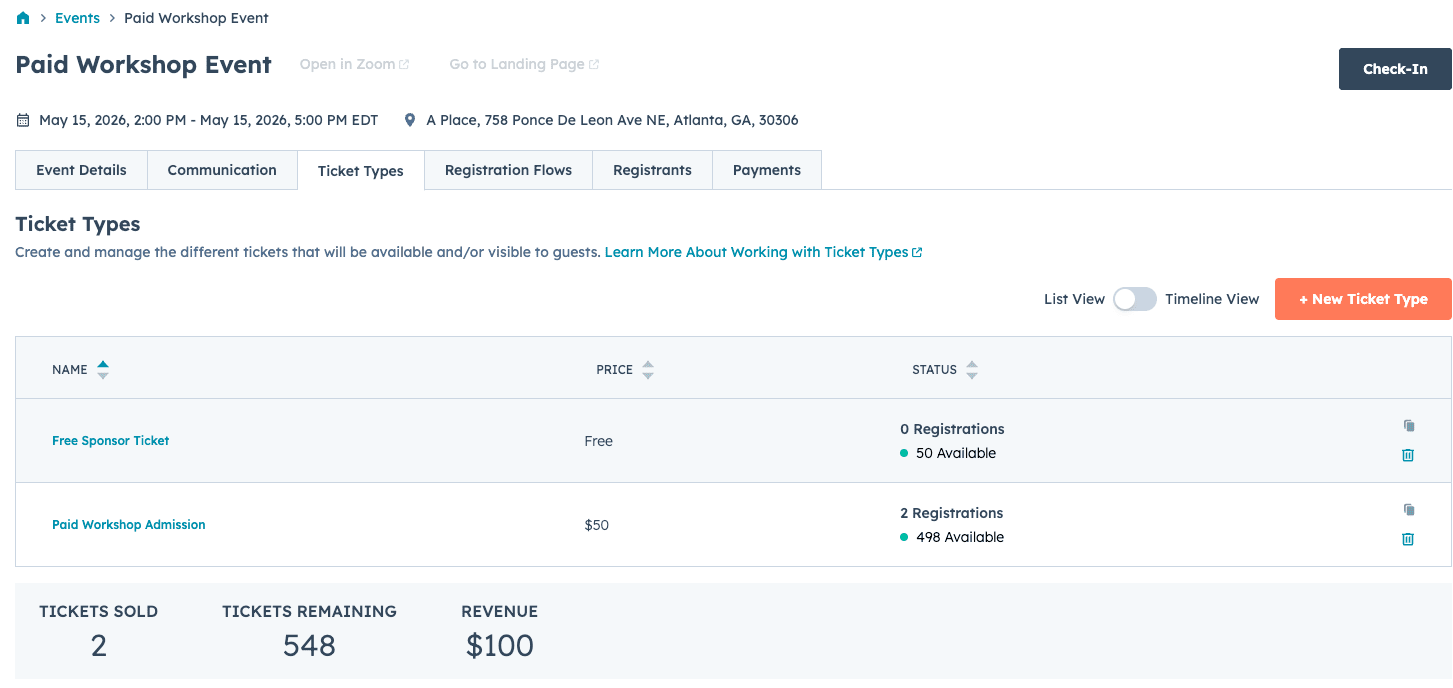
- Review the Registration Types (tickets)
- Don't forget to publish your registration flows
- View current registrants
- See each payment for paid registrations
Step 7: Review HubSpot Data and Member Portal
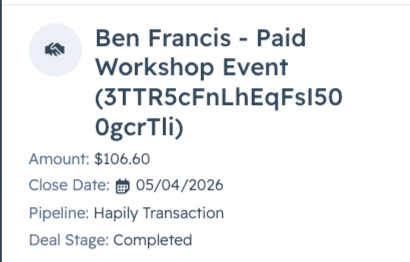
Once a registration is complete, hapily automatically syncs the data to HubSpot:
-
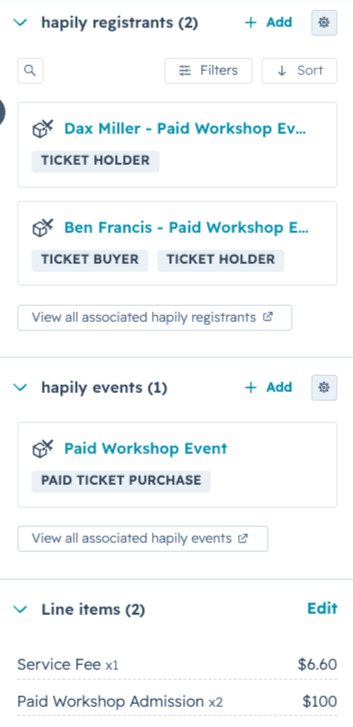
Contacts: New contacts are created or existing records are updated and associated with the event.
-
Deals: A Deal is automatically created in the hapily transaction pipeline with the correct amount and status.
-
The contact who registered or paid for this event will be associated with the deal as the Ticket Buyer
-
Other associated contacts (if guest registration is not enabled) will be associated as Ticket Holder
-
-
Line Items: Specific Line Items (including ticket types and service fees) are attached to the deal for accurate financial reporting.
-
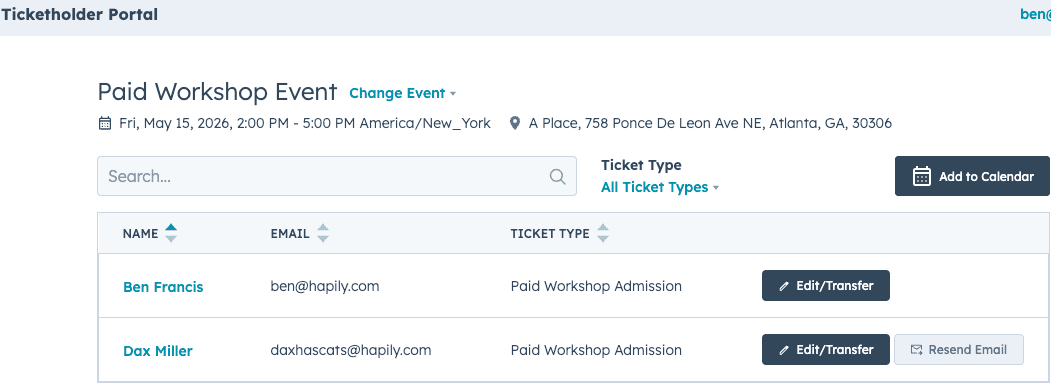
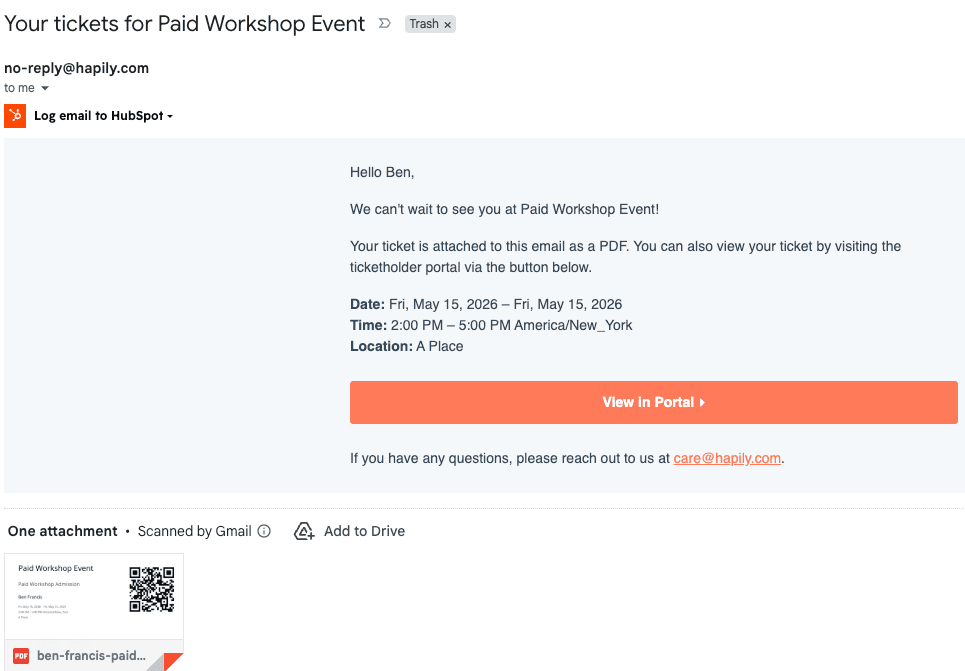
Attendee Portal: Registrants receive a confirmation email with access to a Ticket Holder Portal where they can view their QR Code, add the event to their calendar, or transfer tickets to other attendees.
FAQs
- What fees are charged for paid event registration?
hapily charges a fee in addition to stripe standard processing fees for paid event registration. This is typically 5.9% + 30c per transaction, but can vary based on the payment method and country of issuance. To read more about Stripe's fees, check out this resource - Are fees charged for offline payment methods? No!
- What payment methods are supported through hapily? Credit Cards and wallets such as Apple Pay, PayPal, Google Wallet, etc.
- What happens if someone abandons their purchase?
- Registrations are held for 15 minutes once the registration process has begun. If time elapses, the registration session resets and the previously held registrations are released 5 minutes later.
- If someone opts to 'Cancel Payment' by clicking that button at the checkout screen, registrations are released immediately.
- If enabled from the 'Payments' settings tab, hapily can even create a Deal in the stage 'Abandonded' for any abandoned purchases.
Summary
✅ Created a paid event with specific capacity and pricing.
✅ Configured attendee data collection mapped to HubSpot properties.
✅ Established custom Registration Flows to control ticket visibility.
✅ Verified that sales data, deals, and line items sync automatically to HubSpot.