The Email Automation Manager (also referred to as the Communications Manager) is a new feature in event·hapily that makes it easy to plan, schedule, and manage all event-related emails from a single place—without building and maintaining multiple HubSpot workflows.
It allows you to queue emails for common event audiences (such as Registered, Attended, Did Not Attend, and Event Leads) before, during, and after an event. You focus on writing and refining the email copy, while event·hapily automatically handles list selection, scheduling, and association to the correct event.
🎥 Video Walkthrough:
Watch the Email Automation Manager Overview →

How the Email Automation Manager Works
The Email Automation Manager has two connected components:
-
Communications Manager – a new step in the Event Builder where you pre-configure event emails
-
Email Automation Manager UI – a HubSpot UI extension on the Event record that gives you a centralized view of all event-related emails
Together, they provide a clean, scalable alternative to workflow-heavy email automation.
Step 1: Enable Required Event Lists
Before using the Email Automation Manager, you must enable the appropriate event lists in Event Builder.
When configuring your event assets, ensure you have at least the following lists turned on:
-
Registered
-
Attended
-
Did Not Attend
These lists are required to send emails to those audiences.
If a list is not enabled, the Email Automation Manager will notify you and prevent setup until it’s available.
📝 Tip: Most customers simply enable all lists unless they are certain a specific audience won’t be used.
Step 2: Access the Communications Manager in Event Builder
While creating an event in Event Builder, navigate to the Communications Manager step.
This is where you define:
-
Which emails you want to send
-
Who they should go to
-
When they should be sent
The system will pre-populate some common emails to help you get started.
Step 3: Understand Default Emails
By default, you’ll see a Registration Confirmation Email listed.
-
This email is still sent via a HubSpot workflow
-
Nothing changes about how it’s delivered
-
The Communications Manager simply surfaces it so all event emails are visible in one place
No additional configuration is required if you already enabled confirmation emails earlier in Event Builder.
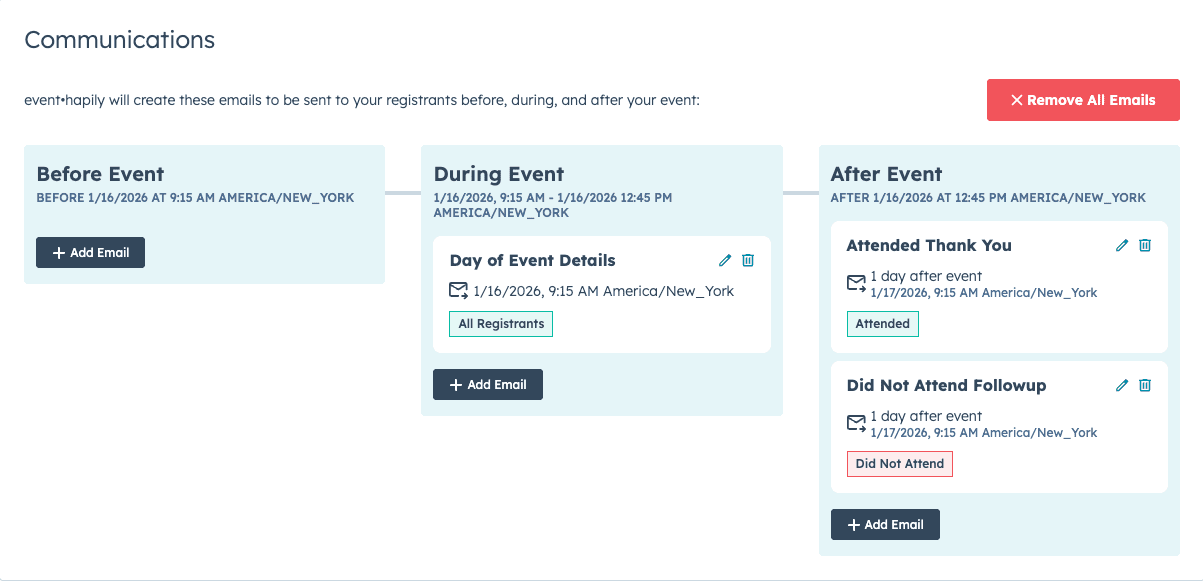
Step 4: Add Pre-Event Emails
To add a new email before the event:
-
Click Add Email
-
Name the email (e.g., Day Before Reminder)
-
Choose when to send it:
-
A specific date, or
-
A relative time (e.g., 1 day before event)
-
-
Select the audience (e.g., Registered)
-
Choose an existing HubSpot email template
The Email Automation Manager automatically:
-
Links the correct event list
-
Schedules the send
-
Associates the email with the event
No workflows required.
Step 5: Add During-Event Emails
You can also schedule emails to send during the event window.
Because event·hapily knows the event’s start and end time, you can:
-
Send messages during the event
-
Target Registered or Attended audiences
-
Adjust timing as check-in progresses
This is useful for:
-
Agenda reminders
-
Location updates
-
On-site announcements
Step 6: Add Post-Event Emails
Post-event emails can be sent to multiple audiences, including:
-
Attended
-
Did Not Attend
-
Registered
-
Event Leads (from Mobile Lead Capture)
Examples include:
-
Thank-you emails
-
Follow-up resources
-
No-show re-engagement
-
Lead follow-up after trade shows
You can remove any default emails you don’t need and keep only the ones relevant to your event.
Step 7: Review Built Emails in HubSpot
Once Event Builder finishes creating your event, event·hapily automatically builds all configured emails inside HubSpot.
Each email:
-
Uses your selected template
-
Has the correct list injected
-
Is scheduled for the correct time
-
Is named using a consistent event-based naming convention
You can open and edit these emails just like any other HubSpot marketing email.
Step 8: Use the Email Automation Manager on the Event Record
On your Event record in HubSpot, you’ll see a new UI extension called Email Automation Manager.
This view provides:
-
A bird’s-eye view of all event emails
-
Status indicators (Draft, Scheduled, Sent)
-
Quick access to open, edit, or link emails
-
Visibility into emails created via the Communications Manager or manually added later
This becomes your central command center for event email automation.

Step 9: Editing, Scheduling, and Status Tracking
From within any email:
-
The correct list is already selected
-
The schedule is pre-configured
-
Any changes you make are reflected immediately in the Email Automation Manager
Once scheduled, the email’s status updates automatically in the Event record view.
Summary
The Email Automation Manager helps you:
✅ Plan all event emails in one place
✅ Eliminate workflow sprawl
✅ Automatically target the correct audiences
✅ Schedule emails relative to event timing
✅ Manage emails directly from the Event record
✅ Scale event communications with less setup and risk