There's nothing worse than when you're running an event and someone walks up isn't on the guest list. "Are you registered?" "Could you step to the side and fill out this form and then get back in line?" Hard Pass.
Enter 'Register Walk-up' with hapily's Check-in page. Not on the list? No problem.
🎥 Video Walkthrough:
Watch the Walk-Up Registration Tutorial →
Introducing Enhanced Walkup Registration Features - Watch Video

What’s Changed
Previously, event·hapily generated a dedicated HubSpot walk-up registration form for each event. While functional, this required admins to manage an additional form—even if it was rarely used.
With this update:
-
Walk-up registration is no longer powered by a HubSpot form
-
A native Walk-Up Registration Form now lives inside the Check-In experience
-
The form writes directly to Registrant records and updates Contact records via the HubSpot API
-
One global form is used across all events
-
Walk-up registration is now supported at both the event level and the session level
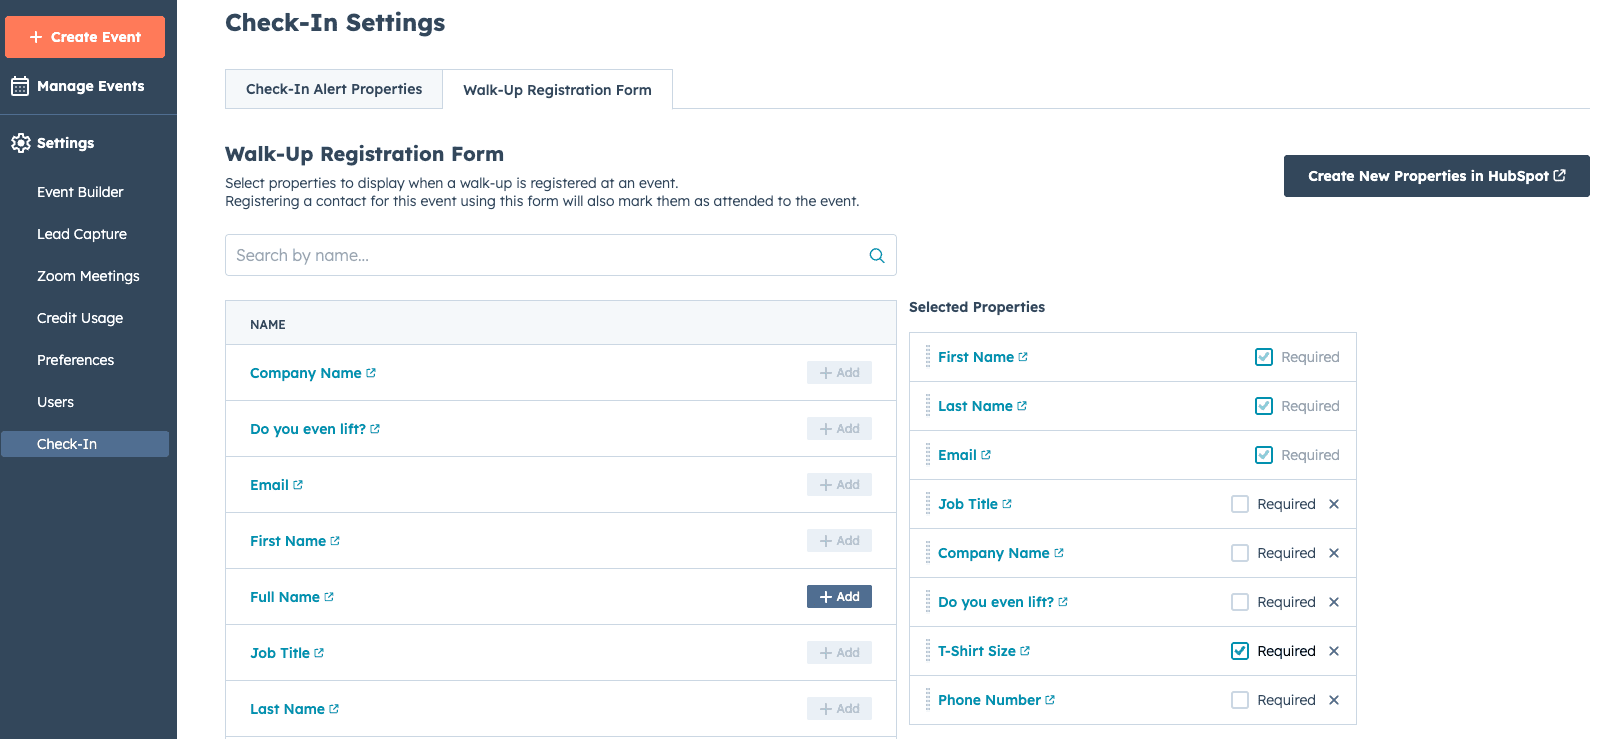
Step 1: Configure the Walk-Up Registration Form
-
Open the event·hapily Admin Panel.
-
Navigate to the Check-In section.
-
Select the Walk-Up Registration Form tab.
This is where you configure the fields that appear when staff register walk-ups on-site.
Step 2: Choose Which Properties to Collect
The Walk-Up Registration Form supports Standard Fields (Contact + Registrant)
-
First Name
-
Last Name
-
Email
-
Phone Number
-
Job Title
-
Company Name
These fields will:
-
Create or update the Contact record
-
Create a Registrant record for the event
Custom Registrant Properties
You can also add custom registrant properties, such as:
-
T-Shirt Size
-
Meal Preference
-
Table Assignment
-
Custom questions specific to your events
You can:
-
Reorder questions
-
Mark fields as required or optional
📝 Note: This configuration is global and applies to all events.
Step 3: How Data Flows into HubSpot
When a walk-up registration is submitted:
-
A Registrant record is created
-
The registrant is immediately marked as Attended
-
A Contact record is created or updated (based on email match)
If you need more control over how registrant data syncs to contacts (overwrite rules, conditional updates, etc.), you can use HubSpot workflows to manage this logic.
Step 4: Register a Walk-Up at the Event Level
-
Open your event’s Check-In Page.
-
Click Register Walk-Up.
-
Fill out the Walk-Up Registration Form.
-
Submit the form.
The attendee is immediately:
-
Registered for the event
-
Marked as Attended
📸 Screenshot placeholder: Event-level Register Walk-Up button
Step 5: Register a Walk-Up at the Session Level (New)
Walk-up registration is now also supported at the session level.
-
Open a session’s Check-In Page.
-
Click Register Walk-Up.
-
Complete the form.
What happens next:
-
If the person already has an event registration:
-
They are registered and marked attended for the session
-
-
If the person does not have an event registration:
-
event·hapily creates the event registration
-
Marks them attended at both the event and session level
-
All associations are handled automatically.
📸 Screenshot placeholder: Session-level Register Walk-Up button
Step 6: Identify Walk-Up Registrations in HubSpot
A new property is now available on the Registrant object:
Walk-Up Registration = Yes / No
This allows you to:
-
Build reports specifically for walk-up attendees
-
Create dynamic lists
-
Trigger automations or follow-up workflows
-
Segment walk-up vs pre-registered attendees
📸 Screenshot placeholder: Walk-Up Registration property on registrant
Summary
The updated Walk-Up Registration experience:
✅ Removes the need to manage HubSpot walk-up forms
✅ Centralizes configuration inside event·hapily
✅ Writes data directly to HubSpot via API
✅ Supports event-level and session-level walk-ups
✅ Automatically marks attendees as attended
✅ Adds a Walk-Up Registration flag for reporting and automation