While event·hapily does not yet include native badge-page generation as a built-in feature, the platform’s registrant data makes it possible to create your own badge page URLs using HubSpot tools. The videos below walk through two different approaches you can use to generate and display badge links for your registrants.
Option 1: Dynamic Content (Content Hub Pro/Enterprise)
Using HubSpot’s dynamic content and the event·hapily Registrant Record ID, you can automatically generate a badge page for every attendee. This approach works by appending the registrant’s unique record ID to a landing page URL, allowing the badge page to pull personalized information from the registrant object.
How to | Dynamic Content Badge Generation - Watch Video

Step 1: Create a Dynamic Badge Template Page
-
In HubSpot, go to Marketing → Landing Pages.
-
Create or open your badge template page.
-
Make the page dynamic, and set the dynamic source to:
-
Object: hapily Registrant
-
Identifier: Record ID
-
Your URL structure should look like: url.com/badge/<record_id>
This tells HubSpot to load the badge template with the data for the registrant whose record ID appears in the URL.
Step 2: Add Registrant Fields to the Badge
On your badge template, insert any of the following registrant properties into the code of the badge module
-
First Name
-
Last Name
-
Company
-
Company Logo

You may also want to remove the page header to avoid printing unwanted elements when sending the badge to a label printer.
Step 3: Automatically Generate Badge URLs
Using a workflow, you can automatically create a Badge Page URL for each registrant:
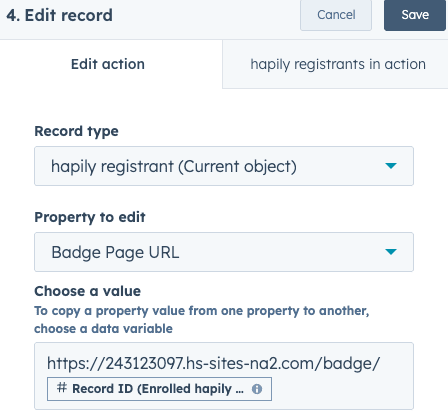
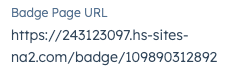
Store this value on a dedicated registrant property (e.g., Badge Page URL).
This allows you to link to the badge page from emails, the check-in page
Step 4: Accessing the Badge During Check-In
This step relies on the Check-In Details feature - Registrant Check-In Details
During the event:
-
Open the Check-In Page for your event.
-
Search for or scan a registrant.
-
Tap the Badge URL to instantly open the dynamically generated badge page.
This page will automatically display the registrant’s information and can trigger a print dialog for any connected badge or label printer.
Option 1: Static Content (NO Content Hub Pro/Enterprise)
If you don’t have Content Hub Professional or Enterprise, you can still generate badge pages using a static template and URL parameters. With event·hapily, you can use a dedicated Badge Template Module that allows you to populate registrant data directly into the page using query string values.
Step 1: Use the Badge Template Module
event·hapily provides a static badge template module you can add to any landing page. Customizing this module will require Design Manager access and a little code knowledge. Ask a developer for help. Within the module, you can configure:
-
Text placements for:
-
First Name
-
Last Name
-
Company
-
-
Additional static elements, logos, or styling
Because this method doesn’t rely on dynamic content, the page itself stays the same — but displays unique information when URL parameters are passed in.
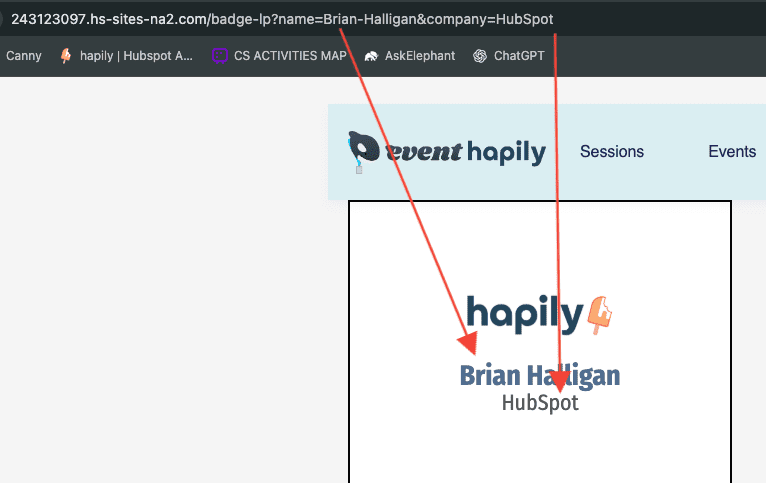
Step 2: Pass Registrant Details as Query Parameters
When a registrant is created, you can populate their badge details using URL parameters such as:
?firstName=Brian&lastName=Halligan&company=HubSpot
Example full URL:
https://yourdomain.com/badge?firstName=Brian&lastName=Halligan&company=HubSpot
The badge template module reads these parameters and displays:
-
First Name: Brian
-
Last Name: Halligan
-
Company: HubSpot
This gives you a fully functional badge display without needing dynamic personalization features.
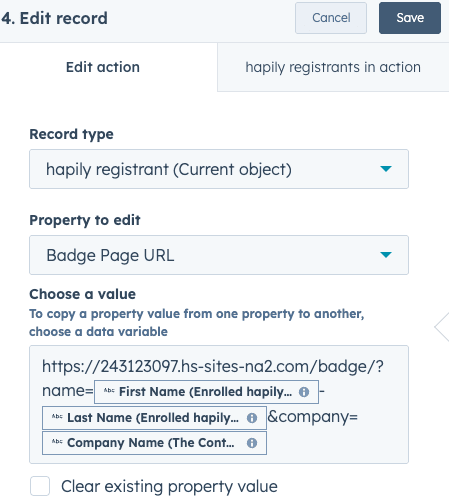
Step 3: Use a Workflow to Auto-Generate the Badge URL
In HubSpot, you can use a workflow to automatically build and store a badge URL for each registrant:
https://yourdomain.com/badge?firstName=&lastName=&company=
Saving this into a Badge Page URL property allows other parts of your system (emails, check-in, lead capture, etc.) to reference it easily.
Step 4: Accessing the Badge Page
When you open the badge URL:
-
The template displays the registrant’s name and company
-
Any default imagery or layout you’ve added appears automatically
-
You can optionally include a small script in your page header to trigger the print dialog immediately
This allows the badge to be printed quickly from any browser or label printer.
FAQs
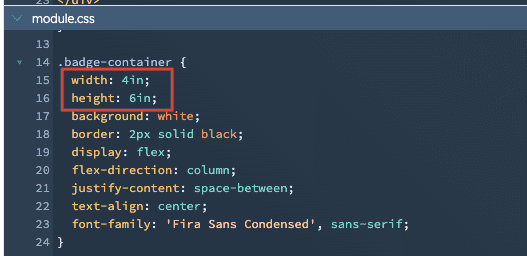
How do I change the size of my badge to fit my label?
A: In the badge module code in Design Manager, you can go to the 'CSS' section of the module and edit the dimensions of the module to match the dimensions of your badge.
How do I make the page automatically trigger the print dialog?
A: Add a bit of HTML to the header of the landing page to trigger the print dialog. Not sure what code to use? Claude or ChatGPT can easily help you generate code to trigger a print dialog on page load.
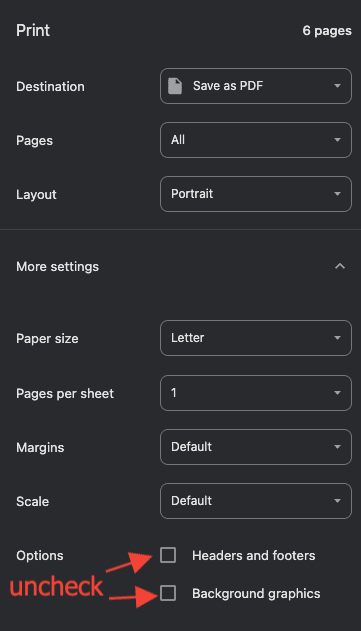
How do I hide the landing page header/footer?
A: When you trigger the Print Dialog, you can hide the header, footer, and background images by unchecking those boxes.