Overview
Dynamic event registration pages allow you to create one single HubSpot landing page that automatically updates based on the event record ID in the URL.
This means you can:
-
Reuse one page template for all events
-
Automatically display the right event details (name, date, image, description)
-
Instantly generate unique registration links when new events are created
This approach saves your team time, eliminates manual page duplication, and ensures every event page stays synced with your hapily Event object data.
Word to the wise: Although this is simple in HubSpot with Content Hub Professional or Enterprise, this is an advanced HubSpot admin function. If your event needs to have unique content on the page or you need a specific form for one event, we strongly advise using the Event Builder and making a new page and form.
How to | Dynamic Event Landing Pages w/ Content Hub Pro/Enterprise - Watch Video

Prerequisites
Before you begin, make sure you have:
-
Access to HubSpot Landing Pages
-
The following hapily modules installed:
-
Event Session Page Header -
Rich Text -
Multi Registration Form
-
-
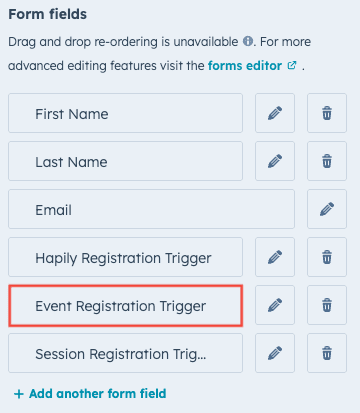
A HubSpot form that includes the hidden property:
Event Registration Trigger
Note: The hidden property is critical for mapping registrations back to the correct event record.
Step 1: Create a New Landing Page
-
In HubSpot, go to Marketing → Website → Landing Pages.
-
Click Create landing page.
-
Add your preferred layout and design — this can include any modules you want, but make sure to include at least:
-
Event Session Page Header
-
Rich Text
-
Multi Registration Form
-
📸 Screenshot placeholder — landing page creation screen
Step 2: Configure Each Module to Be Dynamic
Each module should pull its content dynamically from the hapily Event object.
-
Open each module’s settings panel.
-
Under Data Source, set:
-
Object Type:
hapily Event -
Record: (Leave blank) — this ensures the page is dynamic
-
-
For Event Session Page Header, optionally enable “Show featured image from event.”
-
For Rich Text, confirm the data source is set to
hapily Event. No other changes are needed.

Step 3: Set Up the Registration Form Module
This step connects form submissions to the correct event record.
-
In the Multi Registration Form module, select your HubSpot form.
-
Ensure the form includes a hidden property named:
Event Registration Trigger -
This property allows event•hapily to capture the event’s Record ID from the page URL and link each registration to the right event.
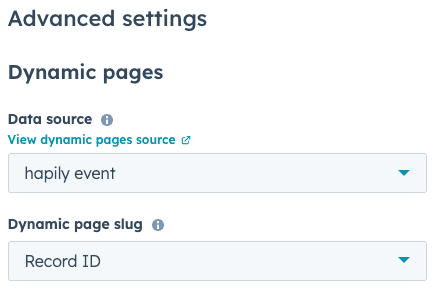
Step 4: Configure Dynamic Page Settings
Once your modules are configured:
-
Click Settings → Data Source at the page level.
-
Under Data Source, set:
-
Object Type:
hapily Event -
Dynamic Page Slug:
Record ID
-
-
(Recommended) Set your metadata fields dynamically:
-
Title:
Event Name -
Meta Description:
Event Description -
Featured Image:
Event Featured Image
-
These settings help search engines and social shares display accurate event information.
Step 5: Preview and Test Your Dynamic Page
Once saved, your page will have a base URL, for example:
https://yourdomain.com/event-page
Append any event’s Record ID to the end to display the corresponding event details:
https://yourdomain.com/event-page/123456789
Each Record ID dynamically changes:
-
Header image
-
Description
-
Registration form
Example:
-
/event-page/123→ Displays Multi-Session Event -
/event-page/456→ Displays Mario Kart Tournament
Step 6: Automate URL Generation (Recommended)
To automate page creation and URL generation:
-
Locate the workflow “New Event Created” inside HubSpot.
-
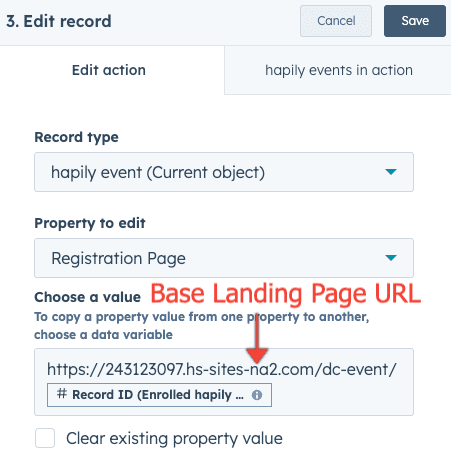
Add an action to:
-
Take your base landing page URL
-
Append the event’s Record ID
-
Write that value into the Registration Page URL property on the event record
-
This way, every time a new event record is created, a ready-to-share registration page link is automatically generated — no manual setup required.
Summary
| Benefit | Description |
|---|---|
| One page, many events | Manage all event pages through a single dynamic template |
| Zero duplication | No need to recreate pages per event |
| Full automation | Use workflows to instantly create registration URLs |
| SEO-friendly | Page titles and descriptions match the event details |