When an event reaches capacity, you may still want to capture interest from additional attendees. With event·hapily, you can create a waitlist experience using HubSpot landing pages, hapily landing page modules, and a simple configuration on your Event record.
This approach allows you to:
-
Cap registrations at a defined limit
-
Automatically switch from registration to waitlist collection
-
Associate waitlisted contacts directly to the event
-
Segment, report on, and follow up with waitlisted contacts in HubSpot
How to | Waitlist for Events - Watch Video

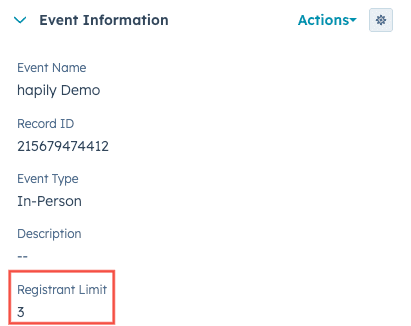
Step 1: Set a Registration Limit on the Event
-
Open your Event record in HubSpot.
-
Locate the Registrant Limit property.
-
Enter the maximum number of registrants allowed for the event.
Once this limit is reached, event·hapily can automatically trigger a waitlist experience on your registration page.
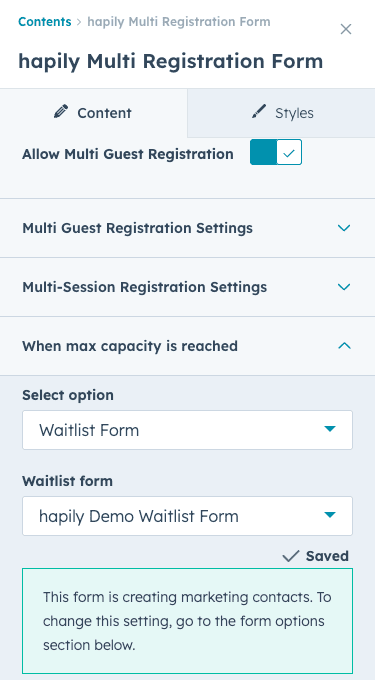
Step 2: Use the Multi-Registration Form Module on Your Landing Page
event·hapily provides a Multi-Registration Form landing page module that supports waitlisting logic out of the box.
-
Open your event registration landing page in HubSpot.
-
Add the Multi-Registration Form module.
-
Configure the module to point to your event.
At the bottom of the module, you’ll see options for handling what happens when max capacity is reached.
Step 3: Configure the Waitlist Behavior
When the event hits its registrant limit, you can choose to:
-
Display a custom message (e.g., “This event is full”)
-
Or allow visitors to join a waitlist using a waitlist form
To enable waitlisting:
-
Select Join Waitlist as the fallback behavior.
-
Choose a Waitlist Form from HubSpot.
This ensures new visitors are captured as waitlisted contacts instead of full registrants.
Step 4: Create a Waitlist Form in HubSpot
Your waitlist form can be a standard HubSpot form with contact fields such as:
-
First Name
-
Last Name
-
Email
Required Hidden Property
Add a hidden field to the form:
-
Property: Happily Registration Trigger
-
Value: JSON string containing:
-
The Event Record ID
-
Behavior set to waitlist
-
This hidden field tells event·hapily to associate the contact to the event as Waitlisted, rather than registering them.
Step 5: Generate the Registration Trigger JSON
To simplify setup, event·hapily provides a Registration Trigger JSON Generator.
-
Enter your Event Record ID.
-
Select the behavior: Waitlist.
-
Generate the JSON value.
-
Copy and paste it into the hidden property on your waitlist form.
This ensures every submission is correctly associated with the event and labeled as waitlisted.

Step 6: Test the Waitlist Flow
-
Register attendees until the Registrant Limit is reached.
-
Attempt to register an additional attendee.
-
Confirm that:
-
The registration form switches to the waitlist form
-
The contact is not registered for the event
-
The contact is associated with the event as Waitlisted
-
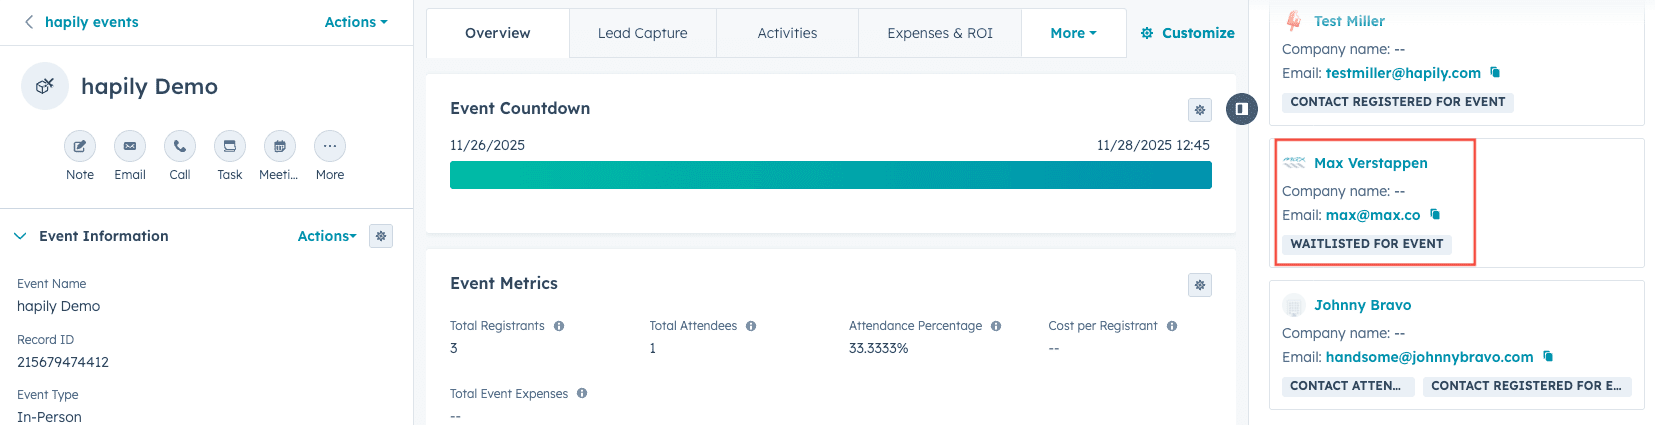
Step 7: View Waitlisted Contacts on the Event Record
Once waitlisted:
-
The contact appears on the Event record
-
The association label reflects Waitlisted for Event
-
Total registrant count remains unchanged
You can add a dedicated Waitlisted Contacts card to your Event record layout for quick visibility.
Step 8: Use Waitlisted Contacts for Follow-Up
Because waitlisted contacts are associated to the event, you can:
-
Create lists of waitlisted contacts
-
Trigger workflows to send waitlist-specific emails
-
Notify contacts if spots open up
-
Report on demand beyond capacity
This gives you full flexibility to manage interest—even after registration closes.
Summary
Using event·hapily’s waitlisting setup, you can:
✅ Cap event registrations
✅ Automatically switch to waitlist collection
✅ Associate waitlisted contacts to the event
✅ Segment and follow up with waitlisted contacts
✅ Manage overflow demand without losing leads
Next Steps: