
The right reminder at the right time keeps registrants showing up and engaged after the event. With the Event Reminders section of the Communications tab in hapily, you can schedule every touchpoint relative to your event and see them all in one place.
This approach allows you to:
- Schedule reminders relative to your event's start or end date and time.
- Target reminders by Registration Type and registrant status (e.g., Registered, Attended, Did Not Attend).
- Insert event and registrant details using personalization tokens.
- Pause, edit, and reschedule a reminder before it sends.
- Automatically send thank-you or "sorry we missed you" emails based on attendance.
🎥 Video Walkthrough:
hapily Event Reminders - Watch Video
Reminders at a Glance
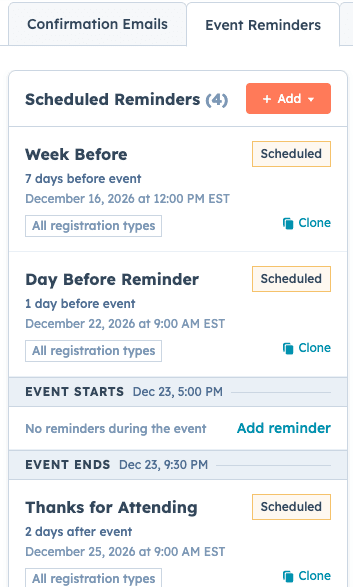
hapily automatically organizes your reminders into sections by when they send relative to the event, so you can see your full communication timeline at once.
|
Section |
Example Reminder |
Send Timing |
Audience |
|---|---|---|---|
|
Before the Event |
Week-before reminder |
7 days before the event, at 12:00 PM |
All registrants with status Registered |
|
Before the Event |
Day-before reminder with entrance instructions |
1 day before the event |
All registrants, or a specific Registration Type (e.g., VIPs) |
|
Event Start |
"We're starting now" email |
Relative to the event's start date and time |
Registrants with status Registered |
|
Event End |
Thanks for attending, with a survey link |
2 days after the event |
Status Attended |
|
Event End |
Sorry we missed you, with a call to action |
2 days after the event |
Status Did Not Attend |
Step 1: Create a Reminder and Set Its Timing
- In the hapily Event Builder, open the Communications tab and go to Event Reminders.
- Create a new reminder and give it an internal name (e.g., Week Before). Registrants won't see this name.
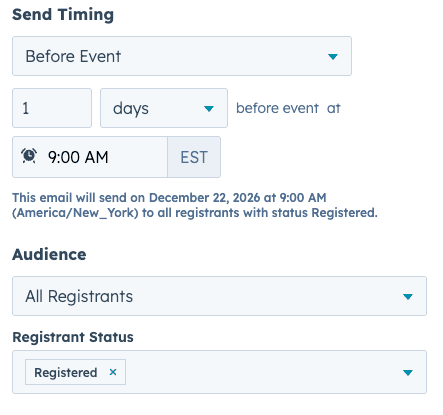
- Under Send Timing, choose when it sends relative to the event (e.g., Before the event, 7 days, at 12:00 PM).
- hapily shows the exact send date and time based on your settings.
Step 2: Choose Your Audience
- Send to everyone registered for the event, or select specific Registration Types (e.g., VIPs get different information than general registrants).
- Select the registrant status to target:
- Registered: the default status when someone signs up. Best for most pre-event reminders.
- Attended: registrants who were checked in.
- Did Not Attend: registrants marked as no-shows (see Step 6).
Step 3: Write Your Reminder
- Add your copy in the text area. A live preview on the right updates as you edit.
- Insert personalization tokens for event and registrant details (e.g., "See you on [event date] at [venue]").
- Upload an image and drag it into position, such as above the header.
- Toggle components on or off: Add to calendar, QR code, and Manage registration.
Step 4: Schedule, Pause, and Edit
- Click Schedule. A yellow icon appears next to the reminder, showing when it sends and to which audience.
- To make last-minute changes, click Pause, update the copy (e.g., add entrance instructions), then click Schedule again.
- Repeat Steps 1–4 for each reminder, such as a day-before email.
⚠️ Note: A paused reminder won't send. Remember to reschedule it after your edits.
Step 5: Schedule Post-Event Follow-Ups
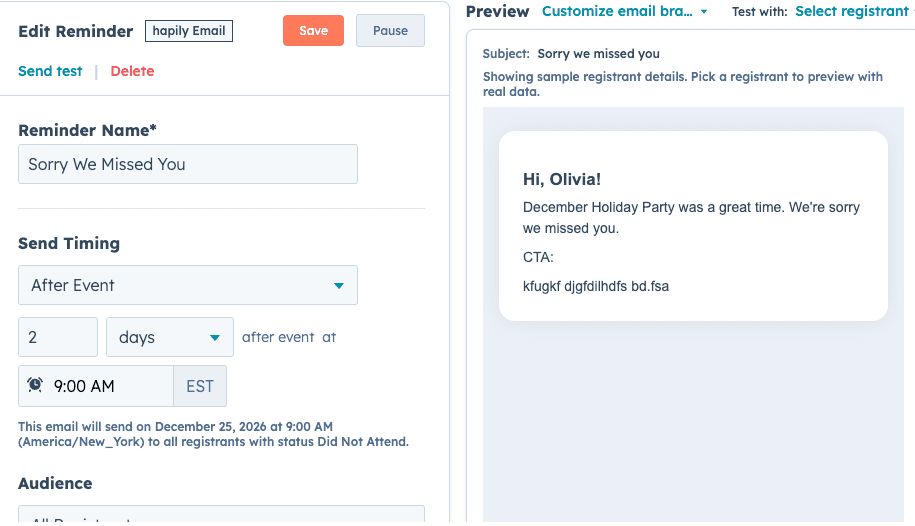
- Create a reminder in the Event End section and set its timing (e.g., 2 days after the event).
- Set the audience status to Attended for a thank-you email, or Did Not Attend for a "sorry we missed you" email.
- Turn off components that don't apply after the event, such as date and location details.
- Add a call to action, like a survey link or promo offer, and link it to your destination URL.
- Click Schedule.
💡 Use Case: For your holiday party, schedule a thank-you email with a feedback survey for everyone who attended. In the same step, schedule a "sorry we missed you" email with a promo offer for anyone who didn't make it.
Optional Step 6: Enable No-Show Tracking
- In hapily Settings, open the Check-In tab.
- Turn on automatic no-show tracking.
- The day after your event ends, hapily marks anyone still in Registered status as Did Not Attend.
⚠️ Note: Turn on no-show tracking before your event ends so Did Not Attend follow-ups reach the right people.
Frequently Asked Questions
Will registrants get two emails if I also have a HubSpot workflow sending reminders?
Yes. Please disable any CRM-powered workflow reminders for your event before scheduling them in hapily to avoid double emails.
What sender name and reply-to address do hapily reminders use?
hapily uses your Sending Domain, so all hapily-sent emails come from your brand.
Do hapily reminders appear on the contact or registrant record in my CRM?
No. Emails sent through hapily come from your domain, not through HubSpot. They don't carry HubSpot's tracking code and won't appear on the timeline in your CRM.
Will contacts who unsubscribed from marketing emails still receive reminders?
Yes. hapily sends reminders as transactional event emails, with no connection to your CRM's subscription statuses.
Can I change a reminder after scheduling it?
Yes. Click Pause, make your edits, then click Schedule again. A paused reminder won't send until you reschedule it.
Summary
✅ The Event Reminders section of the Communications tab schedules every reminder relative to your event's start or end.
✅ Reminders are organized by send date, giving you one view of what sends, when, and to whom.
✅ Target each reminder by Registration Type and registrant status: Registered, Attended, or Did Not Attend.
✅ Pause and reschedule any reminder to make last-minute copy changes.
✅ Turn on no-show tracking so post-event follow-ups reach attendees and no-shows with the right message.
Next Steps: